

It takes very little time and effort to clean the starter motor. This tutorial will go through the steps to remove, disassemble, clean and reassemble the starter motor.
Removal
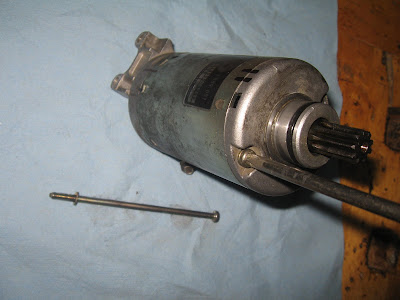
The starter motor is located under the seat, low down on top of the gear box, between the battery and the engine. The starter motor is on the left side of the motorcycle, the alternator on the right side. the starter motor is the smallest of the two. It is mounted to the gearbox using two M8 screws, both accessible once the ECU / tool tray is removed from the bike. To remove the starter motor:
- Lift the seat, remove the Fuel
Injection Computer connector and withdraw the tool
tray.
- Disconnect and remove the battery
for greater accessability
- Use a 8mm wrench to loosen the
nut connecting the electrical wire to the binding
post on top of the motor. Replace the nut so as it
will not be lost.
- Loosen and remove the two M8
screws holding the starter motor to the gearbox
- While carefully wiggling the
motor side to side gently, pull it backwards towards
the rear tire. The motor will eventually withdraw.
You will need the following tools for the cleaning:

- #2 Philips screwdriver
- contact cleaner, such as Deoxit
- toothbrush with nylon bristles
- permanent marker
The disassembly process is as follows:
1. Use the permanent marker to draw reference marks on
both end caps and the stator housing of the motor. These
reference marks will be used when reassembling the motor
to make sure parts are lined up.

2. Using the Philips screwdriver, loosen and remove both
screws holding the motor together
3. Remove the top cap by sliding it up over the pinion
gear.
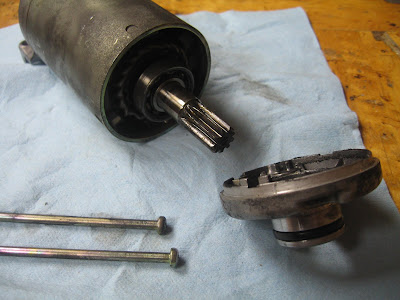
4. Carefully remove the stator housing. There are very
strong magnets in this housing which will put up strong
resistance. Be careful. Make a reference mark on the
brush holder that lines up with the endcap reference
mark

5. Carefully remove the endcap and slide the rotor from
the brush holder. Note that the brushes are sprung.

Cleaning
Using a toothbrush and contact cleaner, scrub the
commutator ring on the rotor free of carbon dust.
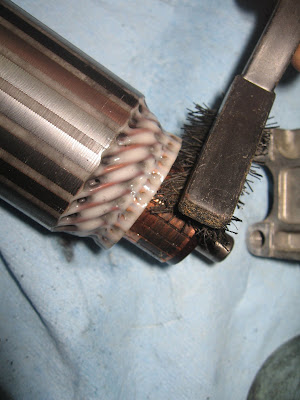
Similarly, clean the brush holder, being careful around
the fine wires that connect to the brushes. If the
topcap is dirty, clean it also with the toothbrush and
cleaner. Avoid the ball bearing on top of the rotor as
it should not be cleaned of oil or grease. Inspect the
O-ring on the top cap; replace this ring if it is
deteriorated because it seals the opening through which
the motor is inserted, preventing oil leakage. It should
not be necessary to clean the stator.
Reassembly
To reassemble the motor, follow the steps above but in
reverse order. Push in the brushes while inserting the
rotor through the brush holder. Assemble the stator
housing over the rotor followed by the topcap, making
sure that the reference marks line up. There are detents
on the housing that will ensure the parts do not rotate
relative to each other. When the parts are assembled,
insert both screws and tighten them down. Make sure the
parts are properly mated by rotating the pinion gear by
hand.

It should be smooth with no binding.
Remount the starter motor back on the bike. Make sure
the motor is inserted into the engine case firmly before
screwing it down. Reattach the electrical wire to the
binding post and secure it with the nut to make a
positive contact. Reinstall and connect the battery,
replace the tool tray and connect up the Fuel Injection
Computer (remember to clean contacts with Deoxit or
similar if this has not been performed recently).